A Small Album for a Long Weekend
A small album for a long weekend turns scattered trip photos into a clear, shareable story by choosing its opening, transitions, and ending first.
How do you make a small album for a long weekend without letting the camera roll make every decision? Start by choosing the trip’s opening, a few transitions, and its ending; then look for pictures that serve those moments. That simple boundary gives the album a story before it has a stack of prints.
Choose the right scale
“Small” is a useful limit, not a fixed page count. Let the trip’s shape and the way you plan to share the album guide its size. A family keepsake that will sit on a coffee table can give more room to faces and handwritten notes. A slim book for friends who traveled with you can move briskly, with only enough pictures to bring the shared route back to mind.
Sort yourself by situation:
- One main outing: If the weekend revolved around a hike, concert, or visit to one place, choose a compact sequence around that outing. It has a natural middle, so you need only a brief arrival and departure around it.
- Several stops: If you moved between a town, a trail, and a friend’s house, reserve a transition picture for each change. A road sign, a train window, or a meal can orient the reader without turning the album into a travel log.
- Mostly unplanned time: If the pleasure came from wandering and conversation, build around small shifts in mood rather than a strict itinerary. A quiet breakfast can lead into a busy street, then a restful last scene.
- Sharing with people who were there: Favor details that prompt recognition: the café table, a familiar coat in the wind, the odd sign everyone joked about. Those pictures may mean more to this audience than a polished view of a landmark.
Pick one situation as the album’s main shape. You can still include other kinds of pictures, but a clear center helps you decide what belongs.
Plan the story arc
Before opening the full camera roll, write three short prompts on a note: “We arrived,” “The weekend changed here,” and “We left with this.” They are not captions or required scenes. They are search directions for the pictures you already have.
The opening might be a station platform, a key on a rental table, or the first view from a car window. Choose an image that places the reader near the start, not necessarily the most dramatic image from the trip. For the ending, look for a closing gesture: packed bags, one last walk, or the view slipping away through glass. A departure picture can leave a softer finish than a posed group portrait, though either can suit the trip.
Between those ends, select a few transitions. Each should signal a change the reader can see: indoors to outdoors, daytime to evening, one place to another, or a shift from activity to rest. If two pictures do the same orienting job, keep the one with the clearer sense of place or feeling. You are shaping a small route through the weekend, not recording every turn.
Gather candidate pictures
Search by date, location, or album in Apple Photos, Google Photos, or the photo app you already use. First collect possible opening, transition, and ending images into a temporary album. Then browse the remaining pictures for a handful of scenes that add something different: a face, a landscape, an object, a meal, or a moment of motion.
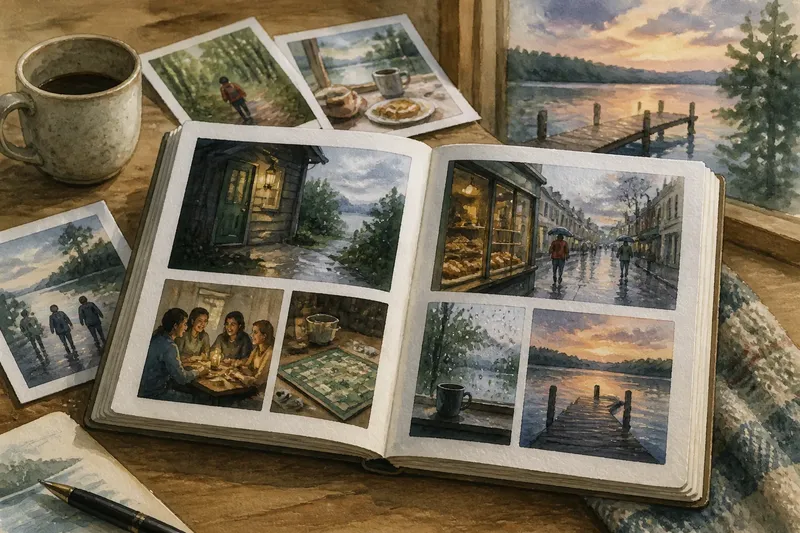
Say you spent a long weekend at a lakeside cabin, with a walk into town between rainy afternoons. Imagine the first candidate is a picture of the cabin door and a damp path; the transition is a bakery window in town; the ending is the empty dock at dusk. You could place a shared meal and a rain-speckled board game between them. The expected result is a sequence that moves from arrival to a change of setting and then to a quiet farewell, rather than a row of unrelated camera-roll highlights.
When choosing between near-duplicates, ask what each contributes to the sequence. One image may show who was present; another may explain where the group went. Keep both only if they make distinct points. This decision is about the album’s shape, not a rule against similar pictures.
Make the transitions clear
Lay the candidates out as thumbnails in a phone album, a contact sheet, or a simple grid in a notes app. Move them around and look for abrupt jumps. If the sequence goes from a breakfast table to a night view with no clue that the group spent the afternoon elsewhere, a transition image may help. If the jump feels lively and understandable, leave it alone.
For a printed album, think in spreads rather than isolated frames. A broad landscape can give a spread breathing room; a small detail beside it can make the place feel inhabited. For a digital share, vary the rhythm by alternating scenes with close details, while keeping the opening and ending easy to spot. In either format, avoid adding a picture simply because an empty space feels uncomfortable.
A few short captions can supply information a photograph cannot: a place name, a friend’s nickname, or the reason a particular stop mattered. Keep those details close to the picture they explain. The album’s sequence should still make sense if someone flips through without reading every caption.
Which shape fits your trip?
What if the weekend had no clear itinerary?
Use changes in mood as transitions: anticipation, bustle, ease, and the feeling of heading home. Choose images that make those shifts visible rather than inventing a route the trip did not follow.
Should every day get equal space?
No; give space according to what the weekend’s story needs. A day with one memorable change of scene may deserve more room than a busy day whose pictures repeat the same setting.
What belongs in an album for friends?
Choose images that restore shared jokes, faces, and little details the group may recognize. A picture that makes sense only to the people who were there can be an ideal keepsake, provided the album is for them.
When should I stop selecting?
Stop when the album has a legible beginning, a few meaningful changes, and a closing image, with no picture doing the same job as another. If a favorite does not fit, keep it in the trip’s general photo collection rather than forcing it into this smaller story.
Set a gentle boundary
Keep the original photographs in their usual library, and make a separate selection for the album. That leaves room to change your mind without losing the wider record. If you are printing, choose a format that feels comfortable to hold and easy to share with the people who will see it; there is no need to make every trip album follow the same template.
A small album for a long weekend works best when its limits help the reader feel the trip’s shape. Before you send it to print or share the digital version, flip through once as someone who did not take the pictures. If the sequence offers enough clues to understand where the weekend begins, changes, and comes to rest, the album has done its work.